Go Widget - sometimes
template that we use not in accordance with our wishes, for example column
widget provided only one when we need the two columns, I created this tutorial
for bloggers who want to Make Two Columns widget on the blog.
To enhance your blog with an
array of gadgets in accordance with the wishes of my friend, in this case the
number of columns of widgets, buddy can make it themselves and it is up to put
where, could be below the post, at the top of the post, under the header, in
the sidebar, in the footer or in other places.
Here's How to Make two
elements Gadget / Widget:
1.
Login to your Blogger account
2.
Select Template >> Edit HTML.
3.
Find the code ]]></
b:skin> by pressing CTRL + F on the keyboard.
4.
Place
the following script above ]]> </ b:skin>:
CSS - Go Widget
#box-main-container {
clear:both;
}
.box-column {
padding:0px 10px 10px 10px;
border:1px dotted $bordercolor;
}
√ You can change the padding
(the distance gadget position) 0px 10px 10px 10px means the distance (Up,
Right, Down, Left).
√ You can also change the border (edge lines widgets) with color, how to delete $ bordercolor and replace with the color code you want.
5. Then find the code
<div id =
'main-wrapper'>
<div id =
"content-wrapper '>
<div id =
"header"> or <div id = 'header-wrapper'>
<div id =
'sidebar-wrapper'>
<div id =
"bottom">
Description :
√ <div id = 'main-wrapper'> is the position of your main page. Usually used for placement horizontall menu or list the contents of a blog.
√ <div id = "content-wrapper '> is the position of the post.
√ <div id = "header"> is the position of the head. Usually placed the blog title and blog description.
√ <div id = 'sidebar-wrapper'> is the position of sidebar.
√ <div id = "bottom"> is the lowest position. Your blog or Footer.
Please choose one, would
place it where.
6. If
you have obtained or almost the same as the above code, place the HTML code
below
HTML - Go Widget
<div id="box-main-container">
<div id="box1" style="float: left;
margin: 0; text-align: left; width: 50%;">
<b:section class="box-column"
id="col1" preferred="yes" style="float:
left;">
</b:section></div>
</b:section></div>
<div id="box2" style="float: right;
margin: 0; text-align: left; width: 50%;">
<b:section class="box-column"
id="col2" preferred="yes" style="float:
right;">
</b:section></div>
</b:section></div>
<div style="clear: both;">
</div></div>
Please you put it at the top
or below the one that code.
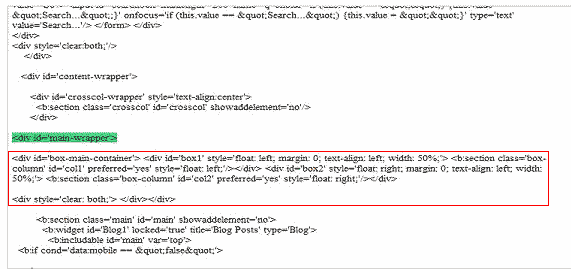
√ For example, I put under
the code <div id = 'main-wrapper'>
7. The
results are as shown below
8. If
you are finished click Preview / preview first, then click Save Template
If you liked the article on this blog, Please feel free to subscribe via email, so you will get an article submission every article published in the Go widget. Hopefully the above tutorial can be useful and beneficial ...


pcreviewer.org website is a participant in the Amazon Services LLC Associates Program, an affiliate advertising program designed to provide a means for sites to earn advertising fees by advertising and linking to Amazon properties including, but not limited to, amazon.com, endless.com, myhabit.com, smallparts.com, or amazonwireless.com. The Website Also Earns from Viglink Affiliate.
ReplyDeletehttp://pcreviewer.org