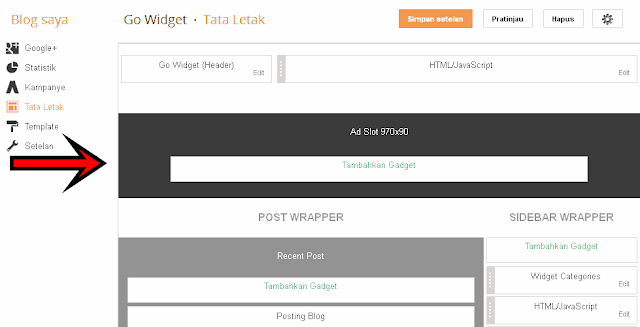
Go Widget - After seeing that lay under
the column header aiklan code is much more efficient, so this time I wanted to
share tutorials Create 1 Column Add a Gadget (ADD PAGE ELEMENT) under the
header
And to add or create columns
add gadgets (add page element) under the header was not as difficult as I
imagined
Yes. Even after I tried to
somewhat personalized code, apparently to make more than one column Add Gadget
under the header also feels so easy. Want to know how? Take a look at the
tutorial below.
it's easy, is as follows:
1. Login to your Blogger Account >> layout >>
Edit HTML
2. As a precaution when edit it later on the outcome of things are not liking, then first download the initial template, so that we can restore the original template as a way to upload (upload) the initial template has been downloaded previously.
3. After searching the code ]]></ b:skin> and add the following code above:
CSS - Go Widget
#under_header{ width:970px;
}
4. After that find the line
of code following (or similar, depending on the model template you are using
HTML - Go Widget
<div id='header-wrapper'>
<b:section class='header' id='header'
maxwidget="1" showaddelement="no">
<b:widget id='Header1' locked='true' title='Blog Name
(Header)' type='Header'/>
</b:section>
</div>
5. And add the following code under the code above:
HTML - Go Widget
<div
id="under_header">
<b:section class='header'
id='underheader' preferred='yes'/>
</div>
6. so that the composition of the code would be as shown in the figure below:
7. Then click SAVE TEMPLATE,
and check on whether the column Page Element Add a Gadget newly created already
appeared under the header as shown in the first image above.
If you liked the article on
this blog, Please feel free to subscribe via email, so you will get an article
submission every article published in the Go widget. Hopefully the above
tutorial can be useful and beneficial ...


